a31 October 2013

Road through the valley

Dolina Strążyska
Click on the photo to view it in large size on black background.
Yet another photo of a road leading through the valley. The light in this case was very extreme. The shadows in foreground were really really dark and the highlights in the sky were extremely bright. For that reason I captured 7 exposures at 1.5 EV spacing.

Technical details:
Camera: Canon 5D MK III
Lens: Canon 24-105 f/4 L IS USM
Focal length: 28 mm
Aperture: f/14.0
Exposure time: 1/200 s ("middle" exposure)
ISO: 100
Number of exposures: 7
E.V. Step: 1.5
Flash used: no
Tripod: yes
Filters: circular polarizing filter
Technique: manual blending, luminosity masks
Software: Magic Lantern 2.3, Lightroom 5.0, Photoshop CC

Continue reading for more details »

a30 October 2013

Postcard from Tatra Mountains

Hala Gąsienicowa
Click on the photo to view it in large size on black background.
Today I'm back to sharing photos from Tatra mountains - today another photo from Hala Gasienicowa. When I first saw this scene I knew it'll make a great landscape photo: beautiful view, wonderful colours, interesting clouds and nice light & shadow play on the mountains. I just couldn't get it wrong.

Also if up to now you wondered whether you can use Fusion/Real-Estate from Photomatix Pro 5 beta for landscape photography above photo should be the answer. The result is realistic and at the same time has very nice dynamic range.

Technical details:
Camera: Canon 5D MK III
Lens: Canon 24-105 f/4 L IS USM
Focal length: 24 mm
Aperture: f/8.0
Exposure time: 1/200 s ("middle" exposure)
ISO: 640
Number of exposures: 3
E.V. Step: 2.0
Flash used: no
Tripod: no
Filters: circular polarizing filter
Technique: HDR, tone-mapping, luminosity masks
Software: Magic Lantern 2.3, Photomatix Pro 5.0 beta (Contrast Optimizer), Lightroom 5.0, Photoshop CC

Continue reading for more details »

a29 October 2013

Portrait of a meerkat

Portrait of a meerkat
Click on the photo to view it in large size on black background.
Today I'd like to share something different - portrait of a meerkat from Warsaw zoo.

BTW I'm in the process of working on the blog code a little bit again so if you notice something isn't working anymore, please let me know :)

Technical details:
Camera: Canon 5D MK II 
Lens: Canon 70-300 f/4-5.6 L IS USM
Focal length: 300 mm
Aperture: f/5.6
Exposure time: 1/400 s ("middle" exposure)
ISO: 100
Number of exposures: 1
E.V. Step: n/a
Flash used: no
Tripod: no
Filters: no
Technique: n/a
Software: Magic Lantern 2.3, Lightroom 5.0, Photoshop CC

Continue reading for more details »

a28 October 2013

First ever Editor's Choice Award

Hala Kondratowa
Click on the photo to view it in large size on black background.
I'm very happy and proud to announce that my photo was published in +Camerapixo magazine, created by +Anetta G. Heller and +Artur J. Heller and it was named Editor's Choice. That's first ever Editor's Choice award I earned anywhere. My photos aren't published in the magazines (online or printed) very often so it's even more important for me. Thank you very much!

To get newest issue (Hot Shots) of Camerapixo, go here. My photo is on page 37 but make sure to view whole magazine because photos in it could become a great source of inspiration for you. They are just amazing!

Today's photo was taken in Hala Kondratowa in Tatra mountains. I wanted to compose it in such a way that the road leads the eye through the scene and I think I managed to achieve that. I used 5 exposures and tone-mapped them in Photomatix Pro 5 beta.

Technical details:
Camera: Canon 5D MK III
Lens: Canon 24-105 f/4 L IS USM
Focal length: 24 mm
Aperture: f/8.0
Exposure time: 1/200 s ("middle" exposure)
ISO: 100
Number of exposures: 5
E.V. Step: 1.5
Flash used: no
Tripod: yes
Filters: circular polarizing filter
Technique: HDR, tone-mapping, luminosity masks
Software: Magic Lantern 2.3, Photomatix Pro 5.0 beta (Contrast Optimizer), Lightroom 5.0, Photoshop CC

Continue reading for more details »

a27 October 2013

Stars over Giewont

Night over Giewont
Click on the photo to view it in large size on black background.
Recently I don't have luck considering shooting stars. I either have bad weather (clouds, rain, fog) or full moon or both at the same time. However, despite these very difficult conditions I managed to capture above night photo showing Giewont (which is one of the most popular massifs in Polish Tatra mountains) and starry sky just above it.

I'm really happy with the atmosphere of this shot. The fog made it a bit mysterious and the light coming from the street lamp that was just behind me, made this shot a bit surreal. Also to create such mood I used rather warm white balance (if I recall correctly I had it set at about 4500 K).

If you want to learn how to capture starry skies yourself make sure to read my tutorial.

Technical details:
Camera: Canon 5D MK III
Lens: Canon 24 f/1.4 L USM II
Focal length: 24 mm
Aperture: f/3.2
Exposure time: 13 s ("middle" exposure)
ISO: 640
Number of exposures: 1
E.V. Step: n/a
Flash used: no
Tripod: yes
Filters: no
Technique: luminosity masking
Software: Magic Lantern 2.3, Lightroom 5.0, Photoshop CC

Continue reading for more details »

a26 October 2013

Mountain stream in autumn

Mountain stream
Click on the photo to view it in large size on black background.


Today HDR photo of a mountain stream that I photographed in Tatra mountains. I used 3 exposures what was enough to restore all details I wanted.

Continue reading for more details »

a25 October 2013

Tutorial: fixing distortions in Photoshop

Photo with fixed distortions
This landscape photo had some serious issues with distortion. I fixed them using Adaptive Wide Angle filter presented in the video tutorial below.
It's time for another video tutorial, make sure to subscribe to my YouTube channel if you want to be notified on the updates there. Today I will show you various ways to fix distortions inside Photoshop:
  • Using perspective transform tool,
  • Using perspective crop tool,
  • Using upright tool,
  • Using adaptive wide angle tool.
Distortions are something that can sometimes even ruin the photo so it's good to know how to fix them and that it's very easy in fact.

Continue reading for more details »

a24 October 2013

Autumn Lightroom presets collections

Autumn photo from Tatra Mountains
Above photo, taken in Tatra mountains, was processed using presets from this post.


Today I would like to share with you my new presets collection for Adobe Lightroom - this time presets for post-processing autumn landscape photos. Make the colours of autumn pop!

You can download my autumn presets here.

Also if you like them, I would greatly appreciate your feedback and shares of this post amongst your friends. It will motivate me to create & share even more free presets. Let me know your favourite ones too! And make sure to give links to photos processed with these presets in the comments below - I'd be very happy and interested to see them.

BTW you can find more presets created by me here. They include Adobe Lightroom, Topaz Adjust and Photomatix Pro presets. And they are all free!

To import presets into Adobe Lightroom:
  1. Extract downloaded presets, remembering the location where you did extract the files.
  2. Go to Develop module in Lightroom.
  3. Expand Presets panel (it's on the left side just below Navigator).
  4. Right-click on the folder of your choice (eg. User Presets) and select Import...
  5. Navigate to the location where you extracted presets, select all of them and click on the Open button.
There are 6 categories of presets that are described below but each of the presets comes in a few variations what gives a total of 17 autumn presets!

Continue reading for more details »

a23 October 2013

Painterly photo of Dolina Bialego

Dolina Białego
Click on the photo to view it in large size on black background.
I didn't want to take this photo. I found the scene rather boring and the light way too flat. But my girlfriend for some reason spent a few minutes taking photos of it so I decided to reconsider (ok she asked me to :) ) and finally took some images. And I'm glad I did so because otherwise I would miss a great photo opportunity. I know it's not the best approach for photographer to refuse to take photos but I try not to take photos I know I won't have time to process (and I thought it would be the case). I already have thousands of photos in my "TODO" folder and with each trip I add a few thousands more... the folder grows really fast :) I have to limit myself sometimes.

The photo was taken in Dolina Bialego (White Stream Valley) in Polish Tatra mountains and although there are some more popular valleys there (like Dolina Koscieliska or Dolina Chocholowska) if you're in Polish Tatra mountains make sure to visit this particular one as well because it is really pretty and picturesque. No matter it's winter or autumn.

As you can see from the specs below I was lazy and didn't set up my tripod. It required setting ISO to 3200 to get correct exposure but despite such high ISO value there was just a little noise. Well as I mentioned in this post, times when high ISO results were unusable are gone. Modern cameras can handle high ISO pretty well.

Technical details:
Camera: Canon 5D MK III
Lens: Canon 24-105 f/4 L IS USM
Focal length: 35 mm
Aperture: f/7.1
Exposure time: 1/100 s ("middle" exposure)
ISO: 3200
Number of exposures: 1
E.V. Step: n/a
Flash used: no
Tripod: no
Filters: circular polarizing filter
Technique: luminosity masks
Software: Magic Lantern 2.3, Lightroom 5.0, Photoshop CC

Continue reading for more details »

a22 October 2013

Green Mountain

Green mountain
Click on the photo to view it in large size on black background.


Time for another HDR landscape photo from Tatra mountains. Despite it was autumn, there was still a lot of greens there. But there were more autumnal tones as well and I composed this shot in such a way that there are some reds in foreground.

Also if you missed it, check the winners of my post-processing challenge.

If you're interested in my HDR post-processing make sure to read my complete HDR tutorial.

Continue reading for more details »

a21 October 2013

Inspiring Photographers: Miroslav Petrasko

Time for another great photographer in my Inspiring Photographers series. Up to now I featured two fantastic photographers: Michael Woloszynowicz and Mark Johnson. Make sure to check out their works.

Today I would like to feature the very great Miroslav Petrasko who is one of my favourite HDR and travel photographers. In fact I prefer his works to the more famous HDR and travel photographers. What I love about Miroslav's images is that they are ultra realistic yet they are very vibrant at the same time. Something that so many of us try to achieve yet most of us fail when trying.

What's quite funny is that Miroslav started similar to myself (and about the same time as I did if I recall correctly). He works as video game designer (I used to work as video game programmer and dealt with designers on a daily basis ;) or rather with their crazy ideas :) ) and initially it was just a hobby.

But without further ado here are some information about Miroslav.

Follow Miroslav: portfolio, website, Facebook

Bio: "A little about me. I'm from Slovakia and currently live in Bratislava. My normal day job is to be a game designer and photography started as a very small side hobby to this. But as it usually happens, it grew and now it sometimes takes more time, than the day job. Before I started with photography, I used to create abstract images in Photoshop, and that slowly morphed over time into HDR photography for me."

Favorite subjects: "My main subjects are architecture and landscapes. I love showing of symmetry in huge rooms, or the waste spans of bridges. I also try to find reflections everywhere. They always give something special to the photo."

Photo gear: "On the gear side, I currently use a Canon 5D mark II mostly with the Canon 16-35mm F2.8 lens attached to it. On the software side my main tools are Photoshop and Lightroom, sometimes supported by Photomatix and Oloneo Photoengine."

Photography style: "In my postprocessing I try to add a certain glow and colorfullnes to my photos, but still try to keep it close to realism as possible."

Below you will find a small selection of Miroslav Petrasko's works (after viewing them make sure to follow Miroslav's blog and his FB profile as he is uploading some great stuff on a daily basis :) ). Photo at the top of this post and the one just below are one of the best examples of HDR I've ever seen. Great job Miroslav!

Enjoy!


Continue reading for more details »

a20 October 2013

Rocks above valley

Dolina Kościeliska
Click on the photo to view it in large size on black background.
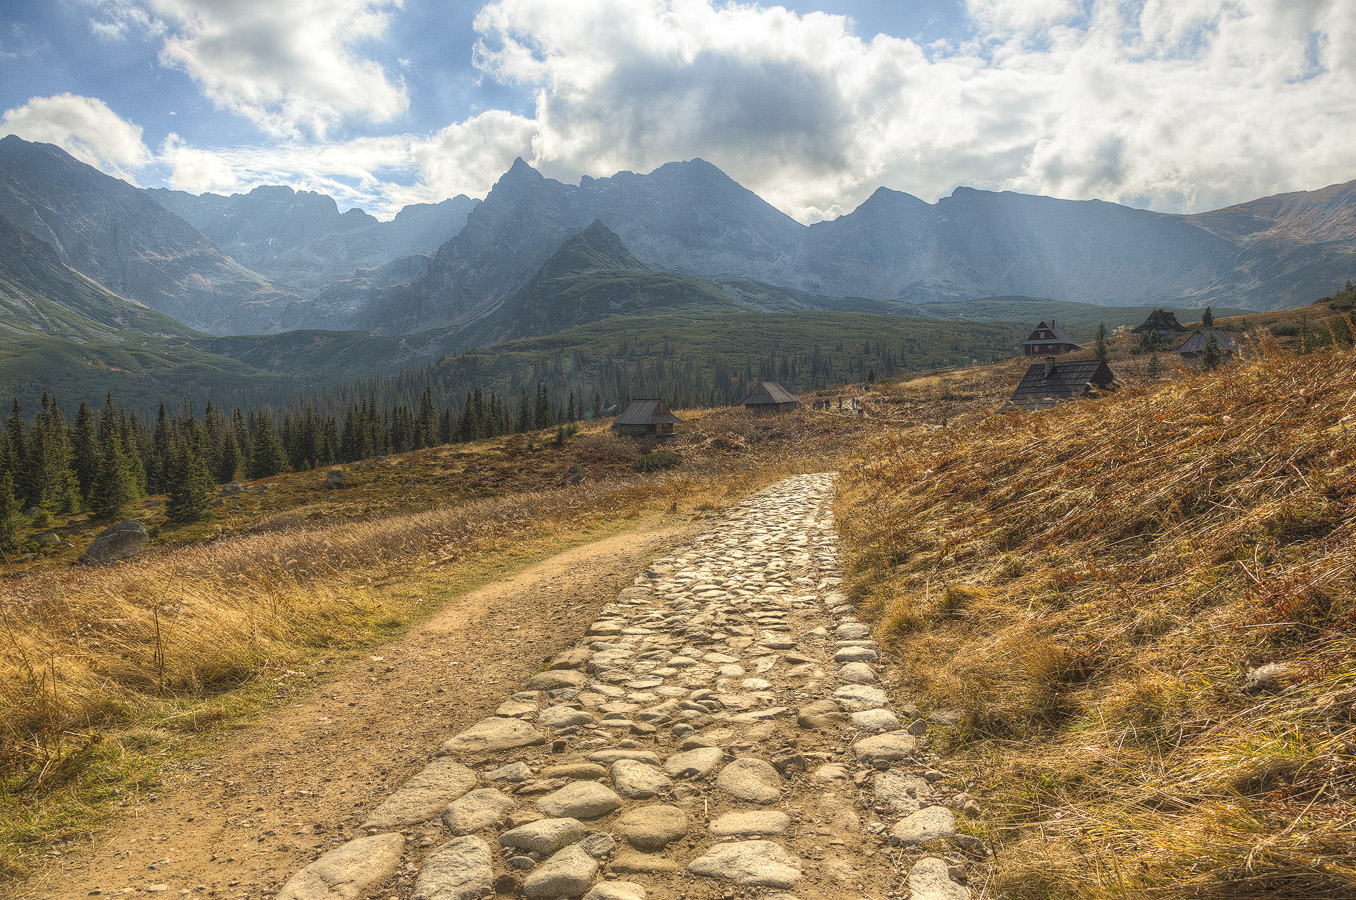
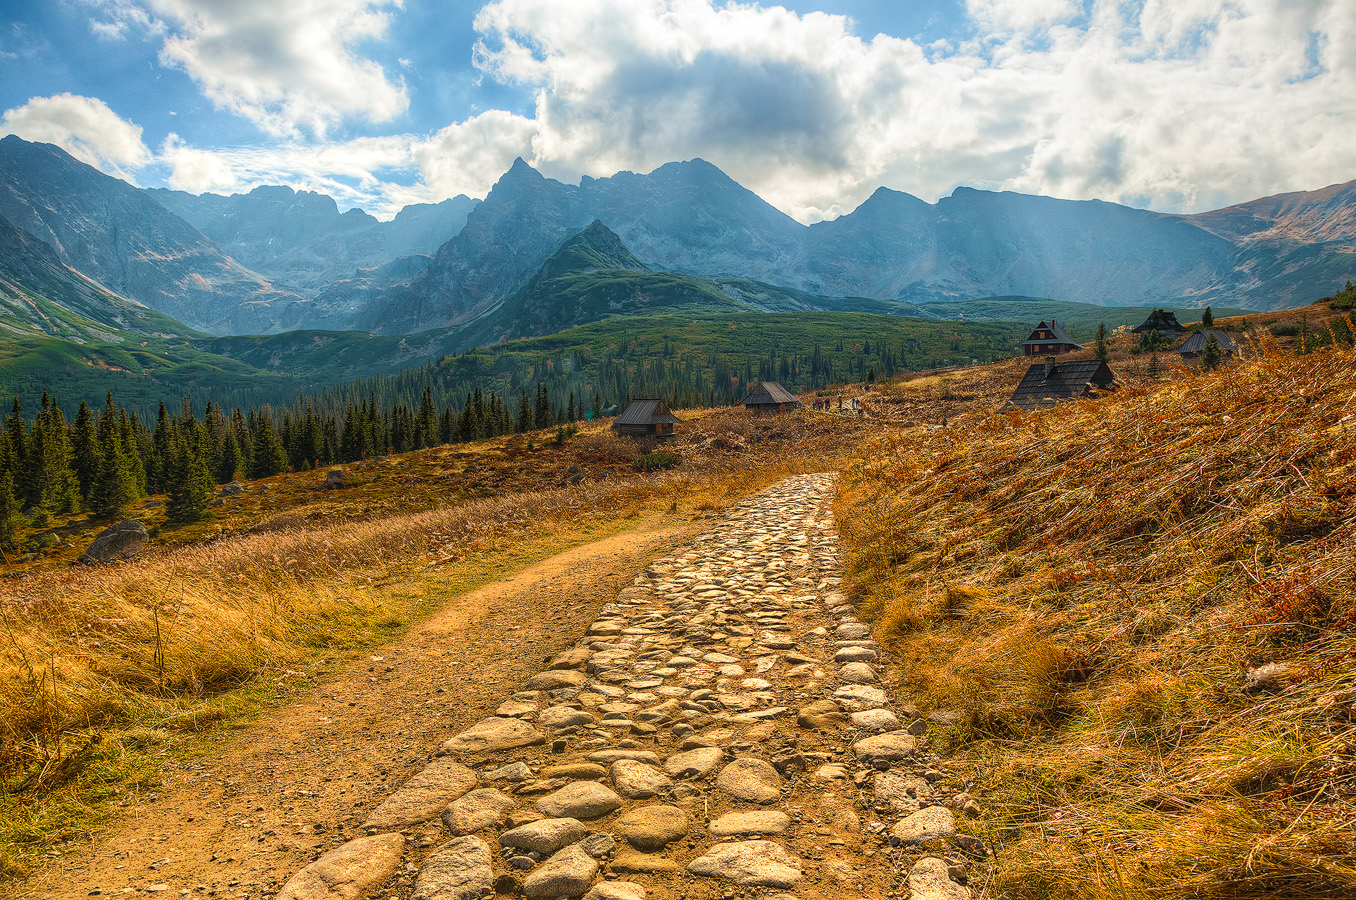
This is a very simple shot. Not much is going on here - I know that :) . However, I still like it because of details in the rocks, colours and layers.

I took this photo in Koscieliska Valley (Dolina Kościeliska) which is one of my favourite valleys in Polish Tatra mountains. It looks beautiful no matter what season and weather it is. If you're in Tatra mountains make sure to visit it, even if you prefer hiking high in the mountains.

BTW there are a few new tutorials I'm working on (a few written and 3rd part of my HDR video tutorial) so stay tuned for updates.

Technical details:
Camera: Canon 5D MK III
Lens: Canon 24-105 f/4 L IS USM
Focal length: 65 mm
Aperture: f/7.1
Exposure time: 1/100 s ("middle" exposure)
ISO: 100
Number of exposures: 3
E.V. Step: 2
Flash used: no
Tripod: no
Filters: circular polarizing filter
Technique: HDR, tone-mapping, luminosity masks
Software: Magic Lantern 2.3, Photomatix Pro 5.0 beta (Contrast Optimizer), Lightroom 5.0, Photoshop CC

Continue reading for more details »

a19 October 2013

Before/after comparison: hala Gasienicowa

before after

It's time for yet another before/after comparison + some post processing details (for more comparisons go here). This time the very beautiful Hala Gąsienicowa in Polish Tatra Mountains.

This time I took only 3 exposures at 2 EV spacing, merged them to HDR and tone-mapped in Photomatix Pro (which is Before). Then I edited my image with luminosity masks technique in Photoshop CC (After).

Continue reading for more details »

a18 October 2013

Meeting a brown bear and Smreczynski Staw

Smreczyński Staw
Smreczyński Staw is a beautiful pond near Kościeliska Valley at the height of about 1200 meters above sea level.


It was a long and rather tiring climb but after a few hours we finally made it to Saddle below Kondracka Kopa (1863 meters above sea level). Unfortunately saddle welcomed us with freezing and very strong wind known as Halny what made it very difficult not only to take some photos but also to rest properly before going down. In fact initially we considered going further to 2005 meters onto Kondracka Kopa but due to the wind we altered our plans and decided to go back directly. After a short break to drink some liquids and eat some snacks we started our descent. It turned out to be even more tiring than the climb. Almost 10 kgs of photo equipment plus additional belongings seemed to be much heavier at this point. The stones seemed to be even more slippery than they were, when we had been climbing up. And the wind didn't make it any easier.

So after going for about 150 or 200 meters, we decided to take a break near some berries bushes. They provided some shelter from cold wind so I thought it's a great place for some quick rest. But soon after we had stopped we heard the voice somewhere from above:

- Do you see it? - I was too tired to realize that it was me and my girlfriend who were supposed to answer.
- Do you see it? - the voice asked the same question for the second time, louder this time and almost at the same time I saw a woman walking down with a small girl. At this stage I realized that we should probably answer.
- What "it"?
- There was a female bear with two children when I was ascending. She was very close to the road and I'm not sure if it's safe to go down or go back up and try finding another route.

That was quite a shock. Bears at this time of year are especially dangerous and female bears with children are even more aggressive because they want to protect their kids (quite natural I would say). And there is one more thing - when bears eat a lot of fruit (like berries or peaches for instance) they're fermenting in their stomachs what make bears behave as after drinking alcohol. So drunk bear, wanting to sleep and being extra anxious about their kids didn't seem like the best that could happen to us.

Continue reading for more details »

a17 October 2013

And the winner is...

There were quite a lot of entries in my post-processing challenge. I hope you had some fun playing with photos taken by me. From my point of view it was also a great experience and inspiring as well to see so many different versions of those photos.

Based on the number of submissions I decided to pick 3 photos which I found most interesting ones. The choice was very tough in fact as I liked many more versions. Also it's very subjective (maybe next time I will make Facebook voting?) so please don't be sad/angry/disappointed if you don't see your photo today.

#1 Vineets Photography:
http://www.vineet-suthan.com/photoblog/

For me it's the most interesting version (and so it's the winner). Use of brown tones looks really interesting and in my opinion fits the image. Also the highlights are properly restored (they weren't in my version ;) ).


#2 Frank Bramkamp:
https://plus.google.com/104762767414084728435/posts

Frank used my photos in quite creative way adding a lot of details and some elements that weren't present in the original shots. This resulted in some great mood.

#3 Foto Buddy:
http://www.flickr.com/photos/foto-buddy/

And last but not least - version with some excellent contrast and sharpness (especially when viewed in large).

Continue reading for more details »

a9 October 2013

Beautiful discovery - Montserrat Monastery

Montserrat Monastery
Click on the photo to view it in large size on black background.
How this could happen I'm not sure but I wasn't aware of this photo for 3.5 years! I took it during my trip to Barcelona in 2010 and for some reason didn't like it at first. And it was patiently waiting on my hard drive for its chance. While viewing and reviewing some older photos today I accidentally came across it. The view immediately attracted my attention. And so did the depth which is really amazing in this photo. So I applied some quick post-processing using selective adjustments in Lightroom... And wow, the image is really nice. Lesson learnt - sometimes photos that doesn't look nice to you might be in fact very good so it's better not to delete them immediately.

BTW you still have some time to take part in my post-processing challenge: http://hdrphotographer.blogspot.com/2013/10/post-processing-challenge-monastery-in.html. I will publish the results in a week from now :)

Continue reading for more details »

a8 October 2013

Beginner's HDR photography tutorial. Part 2. Introduction to Photomatix Pro

Today it is time for second part of my HDR video tutorial. In today's part I'm talking about Photomatix Pro, introducing you briefly to its interface and core features including images alignment, deghosting and of course tone-mapping. In next parts I will go into details on how to create realistic looking images and how to deal with various artifacts and issues that you can encounter in HDR photography.

If you haven't already make sure to watch Part 1 in which I talk about HDR photography in general and give some reasons why we do need it.

Continue reading for more details »

a7 October 2013

Panorama of Tatra Mountains

Panorama of Tatra mountains
Click on the photo to view it in large size on black background.
Time for a panorama photo I took last winter in Tatra mountains. I photographed the mountains while walking in Koscieliska Valley near Zakopane (BTW this valley is really beautiful and great for calm walks without hurry). There was a bit of a fog or some low clouds so the clarity isn't as great as I would like it to be but at least the contrast is great. Dark trees look really nice on the pure white snow background.

Also remember about my post-processing challange: http://hdrphotographer.blogspot.com/2013/10/post-processing-challenge-monastery-in.html.

If you're interested in taking panoramic photos yourself, you can read my tutorial about creating them.

And finally something completely unrelated. I added "Top 5 This Week" section on the right side of the blog in which you will see the most popular (considering number of views) posts from last 7 days. Normally the posts in this list are found useful or informative by a large number of viewers so if you're interested in photography take a look at them from time to time.

Technical details:
Camera: Canon 5D MK II
Lens: Canon 24-105 f/4 L IS USM
Focal length: 24 mm
Aperture: f/7.1
Exposure time: 1/200 s ("middle" exposure)
ISO: 800
Number of exposures: 7 x 3
E.V. Step: 2.0
Flash used: no
Tripod: no
Filters: circular polarizing filter
Technique: HDR, tone-mapping, luminosity masks, panorama
Software: Magic Lantern 2.3, Photomatix Pro 4.2.7, Lightroom 5.0, Photoshop CC

Continue reading for more details »

a6 October 2013

Soft evening light

Winter evening
Click on the photo to view it in large size on black background.
Today I'd like to share old HDR photo taken near Warsaw on one freezing cold winter evening. The light was very beautiful and soft what made this scene look very calm. The winter is coming soon. It's one of my favourite seasons for landscape photography because light is very warm, contrast is huge and there is nothing more beautiful than sun light reflecting in the ice on the river. So if you would like to prepare better for it, you can read my tips on winter HDR photography.

Also it's great to see some entries for my post-processing challenge already. If you haven't sent one already make sure to do it here.

Continue reading for more details »

a5 October 2013

Post-processing challenge: Monastery in Lisbon

Today I would like to invite you to a small fun challenge. Below you will find some 3 bracketed images taken by me. I used them to create a HDR photo above and I'd like to see your version of this image.

Download the bracketed photos for above image here.

Please share the links to your versions in the comments below. I will feature the best of them (how many depends on number of submissions) in a separate post on my blog in about a week. Please also make sure to give a link to your website/FB profile so I can link to them too and give you some viewers.

Also here is a brief description of what I did to give you some ideas and inspiration:
  1. I tone-mapped image in Photomatix Pro 4.2.7 using Details Enhancer.
  2. I applied some global contrast adjustments in Lightroom.
  3. I removed a person from an image using cloning tools.
  4. I increased details clarity.
  5. I added a few solid color layers and blended them with image from Photomatix using different blending modes to get old and desaturated feel.
  6. I increased contrast.
  7. Finally I increased sharpness.

Continue reading for more details »

a4 October 2013

Autumn is here

Colours of autumn
Click on the photo to view it in large size on black background.
Autumn is finally here with its beautiful golden and red tones. And the weather is quite nice in recent days so we can enjoy it.

I took this image a few days ago. I captured 7 exposures which I later merged to HDR and tone-mapped in Photomatix Pro 5 beta. Once again I used the very new Contrast Optimizer tone-mapper.

Technical details:
Camera: Canon 5D MK III
Lens: Canon 24-105 f/4 L IS USM
Focal length: 84 mm
Aperture: f/10.0
Exposure time: 1/6 s ("middle" exposure)
ISO: 100
Number of exposures: 7
E.V. Step: 1
Flash used: no
Tripod: yes
Filters: circular polarizing filter
Technique: HDR, tone-mapping, luminosity masks
Software: Magic Lantern 2.3, Photomatix Pro 5.0 beta (Contrast Optimizer), Lightroom 5.0, Photoshop CC

Continue reading for more details »

a3 October 2013

Steps in Thira

Steps in Thira
Click on the photo to view it in large size on black background.
It's another photo processed with Photomatix Pro 5 Contrast Optimizer (which is one of my favorite features available in beta). This scene required doing HDR for several reasons:
  • shadows near steps in foreground were rather darks,
  • sky was very bright,
  • there were a lot of bright highlights like white tables, houses walls that were reflecting sun light.
However, I wanted a very natural look that wouldn't scream HDR. In Photomatix 4.2.x I often used Details Enhancer. It required using specific settings and also meant some post-processing work as output needed to be low-contrast. But with Contrast Optimizer in Photomatix Pro 5 beta it's so much easier to get natural results. I mainly use default settings which produce very natural and nicely looking result.

Technical details:
Camera: Canon 5D MK III
Lens: Canon 24-105 f/4 L IS USM
Focal length: 28 mm
Aperture: f/11.0
Exposure time: 1/250 s ("middle" exposure)
ISO: 200
Number of exposures: 5
E.V. Step: 1
Flash used: no
Tripod: no
Filters: circular polarizing filter
Technique: HDR, tone-mapping, luminosity masks
Software: Magic Lantern 2.3, Photomatix Pro 5 beta (Contrast Optimizer), Lightroom 5.0, Photoshop CC

Continue reading for more details »

a2 October 2013

Photomatix 5's Contrast Optimizer in Action

Port in Heraklion
Click on the photo to view it in large size on black background.
I have quite a few photos processed with Photomatix Pro 5 beta's new algorithms that were pending upload. Today here is one of them - taken in the port in Heraklion it shows some of the boats.

The boats were moving quite a lot due to strong wind and so were the ropes that you can see in foreground. I used automatic deghosting in this case (which now allows selecting base photo and strength of deghosting) and this way I was able to remove all ghosts from the image.

Technical details:
Camera: Canon 5D MK III
Lens: Canon 24-105 f/4 L IS USM
Focal length: 24 mm
Aperture: f/8.0
Exposure time: 1/160 s ("middle" exposure)
ISO: 100
Number of exposures: 5
E.V. Step: 1
Flash used: no
Tripod: no
Filters: circular polarizing filter
Technique: HDR, tone-mapping, luminosity masks
Software: Magic Lantern 2.3, Photomatix Pro 5 beta (Contrast Optimizer), Lightroom 5.0, Photoshop CC

Continue reading for more details »

a1 October 2013

Photomatix Pro 5 beta released

Example of using Fusion/Real-Estate
I'm not real estate photograher but Fusion/Realistic is really great. Note how well highlights outside the window were preserved.
UPDATE: Photomatix Pro 5 was officially released. Go here for more details, or here to download it.

Recently I was very busy (I had very little time to take and process my photos as you could notice)... today I can finally reveal why :) At HDRsoft Ltd. we've just released public beta of Photomatix Pro 5!

BTW one of the huge benefits of working as a developer in a company creating photo editing applications is that you can try new features much earlier than anyone else. That's great when you're a photographer at the same time ;)

The list of changes is very long so here are only the main updates and additions:
  • 2 completely new processing methods which will be especially welcomed by fans of very natural looking HDR/Fused images:
    • Contrast Optimizer - it is a local tone-mapper. However, it is virtually halo free and also produces very natural looking images (although you can go grungy if you wish). Output from this method is also very clean, has nice clarity and the method is very easy to use. Are you familiar with tone-mapper from Lightroom? If so you will love Contrast Optimizer because in my opinion it often produces even better results (slightly cleaner and more crisp).
    • Fusion/Real-Estate - it's a new fusion method. Although it was present in version 4.2 it was very slow and for that reason it was available only in Batch Bracketed mode (under the name of Fusion/Realistic). Now it's much faster (about 10 times!) and is available in Preview mode as well. It's also greatly improved. I often use this feature instead of manual blending as it gives me the results I would like to get with manual blending. If you're familiar with Fusion/Natural you know that it can sometimes blow out highlights. It's not a problem with Fusion/Real-Estate which preserves them perfectly. Although this method is targeted mainly to real-estate photographers, other photographers will benefit from it as well as I'm definitely not real-estate photographer yet I find it very useful.
  • Improved automatic ghost removal - you can now specify which source photo to use for automatic deghosting as well as strength of deghosting.
  • Improved images alignment - images that didn't align previously when match by features option was used, should do now.
  • Sliders are now real-time - if your CPU is fast enough you can check an option in Preferences to make sliders respond in real-time. That is image will change as you drag the slider.
  • Multiple presets in Batch mode - not only GUI of Batch processing has been redesigned to make it more intuitive to use, but Photomatix 5 also introduces ability to process photos using multiple presets. Up to now it was only possible to use different processing methods at the same time (eg. both Details Enhancer and Fusion/Natural) - now it's possible to process same photos using multiple settings for a given processing method. So now you can even run a batch with all your presets :)
  • Improved transfer of EXIF data.
  • Bug fixes - plenty of them :)

Continue reading for more details »